# Writing tests in prescript
# Conceptual model
In prescript, your “test” (scenario) is separated into multiple discrete “steps”. This results in a “test plan” which looks like this:
Test: Sucessful password reset
├── Step 1. Open browser
├── Deferred Step 2. Close browser
├── Step 3. Request password reset
│   ├── Step 3.1. Go to forgot password page
│   ├── Step 3.2. Enter the email
│   └── Step 3.3. Submit the form
├── Step 4. Open the password reset link in email
│   ├── Step 4.1. Check the email
│   ├── Step 4.2. Open the reset password email
│   └── Step 4.3. Click the reset password link in email
├── Step 5. Reset password
│   ├── Step 5.1. Enter the new password
│   └── Step 5.2. Submit the form
├── Step 6. Login with the new credentials
└── Step 7. I should be in the workspace
There are 4 types of steps:
Action steps performs some kind of action. If an action fail, all subsequent steps will be aborted.
Deferred steps queues an action to be run at the end of the test. It will be run when the test is completed or terminated due to an error in one of the action steps.
Composite steps allows you to group steps together, creating a hierarchy of steps.
Pending steps marks the test as pending. Its behavior is equivalent to a failed action step (that is, it aborts the tests and future steps are not run). But instead of the test being marked as “FAILED” (exit code 1), it will be marked as “PENDING” (exit code 2). This is useful when your test is not complete, or when (temporarily) disabling a test.
# Programming model
We write our test in JavaScript. The above test can be represented in prescript as JavaScript code like this:
const { test, to, action, defer } = require('prescript')
test('Sucessful password reset', () => {
  action('Open browser', async state => { ... })
  defer('Close browser', async state => { ... })
  to('Request password reset', () => {
    action('Go to forgot password page', async state => { ... })
    action('Enter the email', async state => { ... })
    action('Submit the form', async state => { ... })
  })
  to('Open the password reset link in email', () => {
    action('Check the email', async state => { ... })
    action('Open the reset password email', async state => { ... })
    action('Click the reset password link in email', async state => { ... })
  })
  to('Reset password', () => {
    action('Enter the new password', async state => { ... })
    action('Submit the form', async state => { ... })
  })
  action('Login with the new credentials', () => { ... })
  action('I should be in the workspace', () => { ... })
})
Since the test file is a JavaScript file, you can also generate actions indirectly (see the Page Object section down below for an example).
# Execution phases
When you run prescript, there are 2 phases that your code gets executed:
Prescripting phase. In this phase, your test code is first executed to determine what tests are available, including the steps in each test. This results in a test plan being generated. Code outside the
action()anddefer()blocks are executed in this phase.WARNING
All the logic that’s executed during the prescripting phase must be deterministic to allow the test code to be safely hot-reloaded.
Running phase. In this phase, prescript executes the actions according to the test plan generated from the prescripting phase.
# A basic test
Use test() to define a test. Each test must have a unique name.
Use action() to create an action step. You should pass a function that
either returns a Promise (async action) or returns nothing (sync action).
// Basic addition.js
const { test, to, action } = require('prescript')
const assert = require('assert')
const Calculator = require('../lib/Calculator')

test('Basic addition', () => {
  action('Initialize the calculator', state => {
    state.calculator = new Calculator()
  })
  action('Enter 50 into the calculator', state => {
    state.calculator.enter(50)
  })
  action('Enter 70 into the calculator', state => {
    state.calculator.enter(70)
  })
  action('Press add', state => {
    state.calculator.add()
  })
  action('Stored result must be 120', state => {
    assert.equal(state.calculator.result, 120)
  })
})
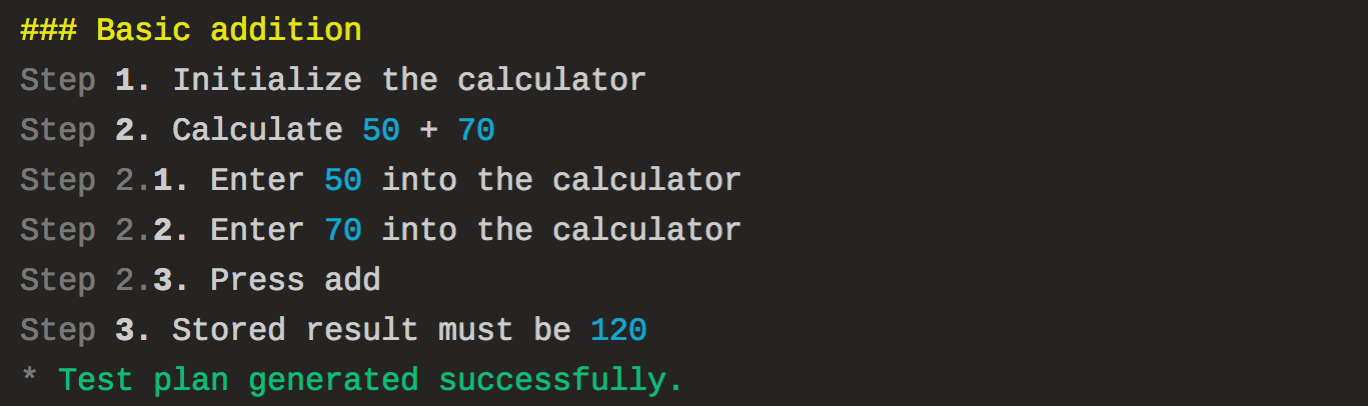
# Use composite steps to group related steps together
Multiple actions may be grouped using to(). This creates a composite step.
// Basic addition.js
test('Basic addition', () => {
  action('Initialize the calculator', state => {
    state.calculator = new Calculator()
  })
  to('Calculate 50 + 70', () => {
    action('Enter 50 into the calculator', state => {
      state.calculator.enter(50)
    })
    action('Enter 70 into the calculator', state => {
      state.calculator.enter(70)
    })
    action('Press add', state => {
      state.calculator.add()
    })
  })
  action('Stored result must be 120', state => {
    assert.equal(state.calculator.result, 120)
  })
})
# Use page object pattern for more fluent and maintainable tests
Upgrading to this pattern is very beneficial when there are many test cases that reuses the same logic.
For more, I highly recommend reading Selenium: 7 Things You Need To Know, even for people who don’t use Selenium. The article contains a lot of great tips for anyone who writes end-to-end tests. And these tips applies even if you’re using something else (e.g. Puppeteer, Appium, etc) to test your app.
In this pattern, instead of creating steps directly in our test code, we write a library that creates the test steps for us.
Here’s the previous test case, using the page object pattern.
// Basic addition.js
const { test } = require('prescript')
const CalculatorTester = require('../test-lib/CalculatorTester')

test('Basic addition', () => {
  new CalculatorTester().add(50, 70).resultMustBe(120)
})
Now our test is much shorter. All of our logic related to controlling the
calculator is now centralized in CalculatorTester. This means
CalculatorTester can be used from many tests, leading to a drier code.
// CalculatorTester.js
const { to, action } = require('prescript')
const Calculator = require('../lib/Calculator')
const assert = require('assert')

module.exports = class CalculatorTester {
  constructor() {
    action('Initialize the calculator', state => {
      state.calculator = new Calculator()
    })
  }

  /**
   * Creates a step that makes the calculator add `a` and `b` together.
   * @param {number} a
   * @param {number} b
   */
  add(a, b) {
    to`Calculate ${a} + ${b}`(() => {
      this.enter(a)
        .enter(b)
        .pressAdd()
    })
    return this
  }

  /**
   * Creates a step that asserts the state of the calculator.
   * @param {number} n
   */
  resultMustBe(n) {
    action`Stored result must be ${n}`(state => {
      assert.equal(state.calculator.result, n)
    })
    return this
  }

  /**
   * Creates a step that enters a number into the calculator.
   * @param {number} number
   */
  enter(number) {
    action`Enter ${number} into the calculator`(state => {
      state.calculator.enter(number)
    })
    return this
  }

  /**
   * Creates a step that presses the add button on the calculator.
   * @param {number} number
   */
  pressAdd() {
    action('Press add', state => {
      state.calculator.add()
    })
    return this
  }
}
WARNING
Due to the way it’s written, our CalculatorTester currently hardcoded to work
with state.calculator. That means it’s capable of working with only a single
calculator, no matter how many CalculatorTester instances you create. This
works fine if you are only testing 1 Calculator instance at the same time.
However sometimes, you might have to test 2 things running simultaneously. For us at Taskworld, we build a collaborative realtime app. So, sometimes we need to run multiple instances of the browser at the same time, to verify that updates from A gets sent to browser B in real-time.
For this, you can adjust your page object to receive the state key in which it will operate on.
module.exports = class CalculatorTester {
  constructor(stateKey = 'calculator') {
    this._stateKey = stateKey
    action('Initialize the calculator', state => {
      state[this._stateKey] = new Calculator()
    })
  }
THE TAGGED TEMPLATE LITERAL SYNTAX
When creating steps that involves variables, you can use a tagged template literals syntax, as can be seen in the example above:
    action`Stored result must be ${n}`(state => {
      assert.equal(state.calculator.result, n)
    })
When run, the substitutions (${n}) will be color-coded. This is an indication
that suggests you not to use the substituted text when search the source code
for the step you want.
# Pending steps
Pending steps are quite useful. When a pending step is run, it marks the test as pending. When run in non-interactive mode, prescript will exit with code 2.
# When developing tests
When developing a new test, it’s useful to put pending() in the test, because:
This explicitly marks the test as unfinished.
When running in development mode, this causes the test to pause. Otherwise, the deferred step (‘Close browser’) would be run right away, closing the browser.
const puppeteer = require('puppeteer')
const { test, action, defer, pending } = require('prescript')
const assert = require('assert')

test('A quest for "prescript" on npm', () => {
  action('Open a web browser', async state => {
    state.browser = await puppeteer.launch({ headless: false })
    state.page = await state.browser.newPage()
  })
  defer('Close browser', async state => {
    state.browser.close()
  })
  pending()
})
# Temporarily disabling a test
If some tests are getting in the way and you need to ship your stuff, you can
promise to “fix it later” by calling pending() if a certain time isn’t
reached.
// I will fix it later, I promise!
if (Date.now() < Date.parse('2018-10-01T10:00:00Z')) pending()