# A quick prescript primer (Tutorial)
Ready for a prescripted experience? You’ll need:
I assume you know how to use Node.js and Yarn.
In this tutorial, we’ll learn:
- How to create a test file.
- How to use the prescript interactive shell to debug and fix a test file.
- How to run the test and generate a report.
We’re going to write a simple test using prescript and
Puppeteer. It will go to
npmjs.com, search for prescript, and verify that prescript is actually on
npm.
# Test project setup
Let’s start by creating a new project:
mkdir prescript-tutorial
cd prescript-tutorial
Install
prescriptandpuppeteer:yarn add --dev prescript puppeteerCreate a folder to store all our tests:
mkdir tests
Now, our directory structure should look like this:
prescript-tutorial
├── tests/
├── package.json
└── yarn.lock
# Create the test file
Create a file called
tests/npm-search.jsand paste in:const puppeteer = require('puppeteer') const { test, action, defer } = require('prescript') const assert = require('assert') test('A quest for "prescript" on npm', () => { action('Open a web browser', async state => { state.browser = await puppeteer.launch({ headless: false }) state.page = await state.browser.newPage() }) defer('Close browser', async state => { state.browser.close() }) action('Go to npmjs.com', async state => { await state.page.goto('https://npmjs.com') }) action('Search for prescript', async state => { await state.page.type('[name="q"]', 'prescript') }) action('Verify that the description is correct', async state => { const description = await getText( state.page, '[class^="package-list-item__description"]' ) assert.equal(description, 'an end-to-end test runner that sparks joy') }) }) function getText(page, selector) { return page.evaluate( selector => document.querySelector(selector).textContent, selector ) }
- The
test()function declares a test. A test can contain multiple steps. - The
action()function declares an action step, which represents a test action to be executed. - The
defer()function declares a deferred step, which represents an action to be performed at the end of the test (similar to Go’s defer statement), and is useful for cleaning up and closing resources.
THE `state` VARIABLE
You may notice there’s a variable called state. You must put everything that’s
shared between steps in this variable.
Do not create variables to hold the state of your tests. You may ask, “why
can’t we just use local variables, i.e. putting let browser at the top of the
file?” Well, you’ll see why soon… 😉
# Run the test in development mode
Now we have the test, let’s run it!
Run the test in development mode using
yarn prescript -d <test-file>:yarn prescript -d tests/npm-search.js
This will drop you into a prescript interactive shell:
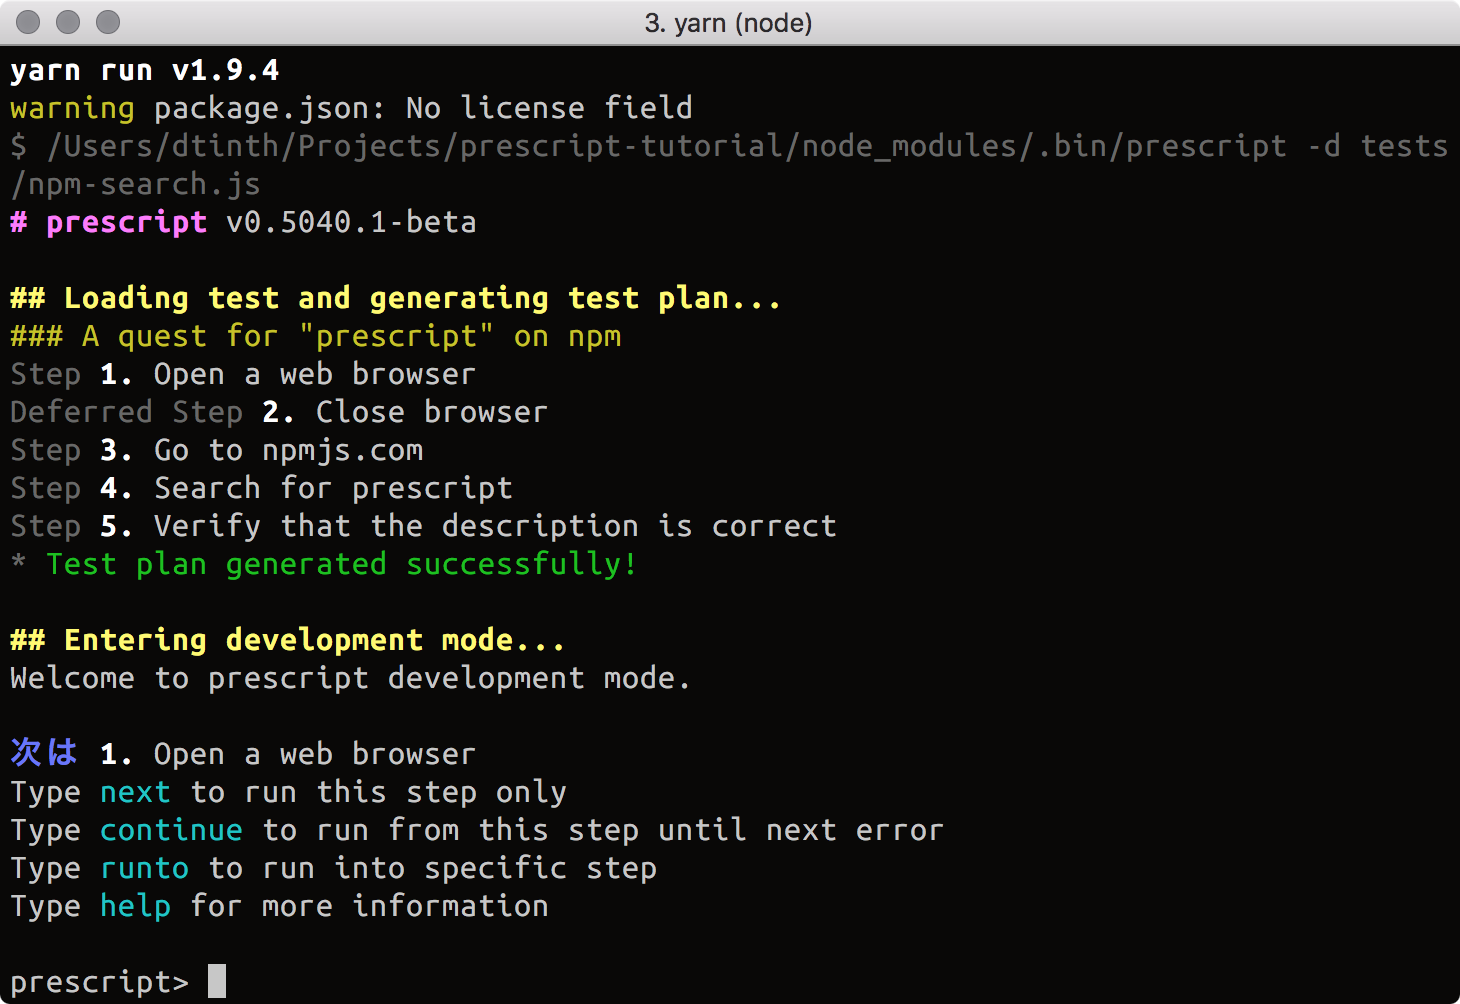
- Type in
continueand press Enter.
This will run the test to its completion (or until it hits an error).
Let’s see how it goes…
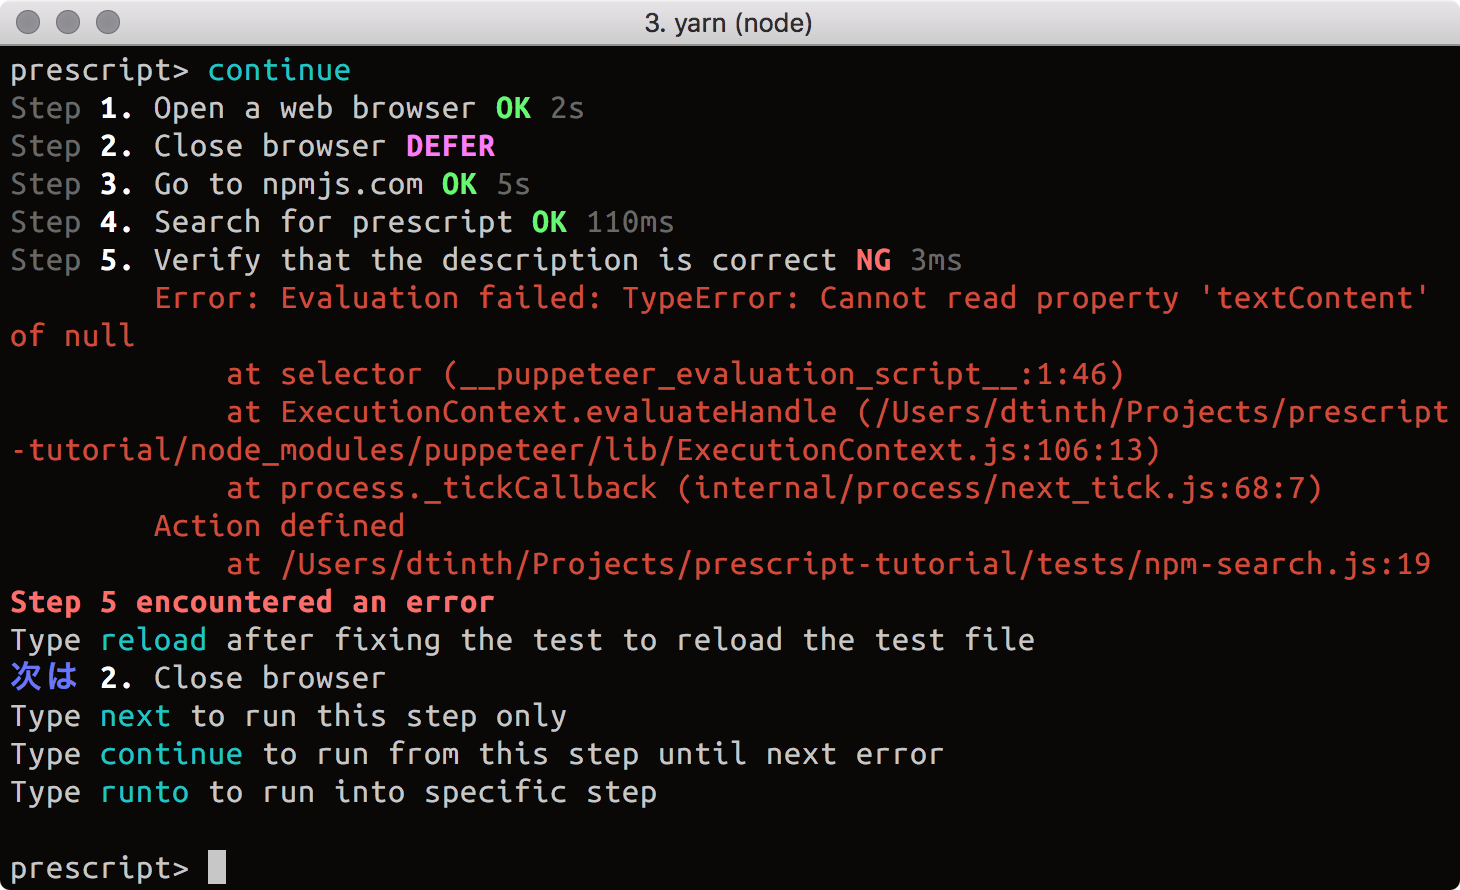
Oops, there’s an error!
From the terminal output, we see that the test failed at step 5 (‘Verify that the description is correct’)… This is one benefit of breaking your test into discrete steps — the tool can tell you exactly which step failed.
It’s time to debug!
# Debugging the test
Now, since we are in interactive development mode, the test is paused here to let you inspect what’s going on. (In many other tools, the browser would have closed immediately.)
Now we can take a look at the browser:
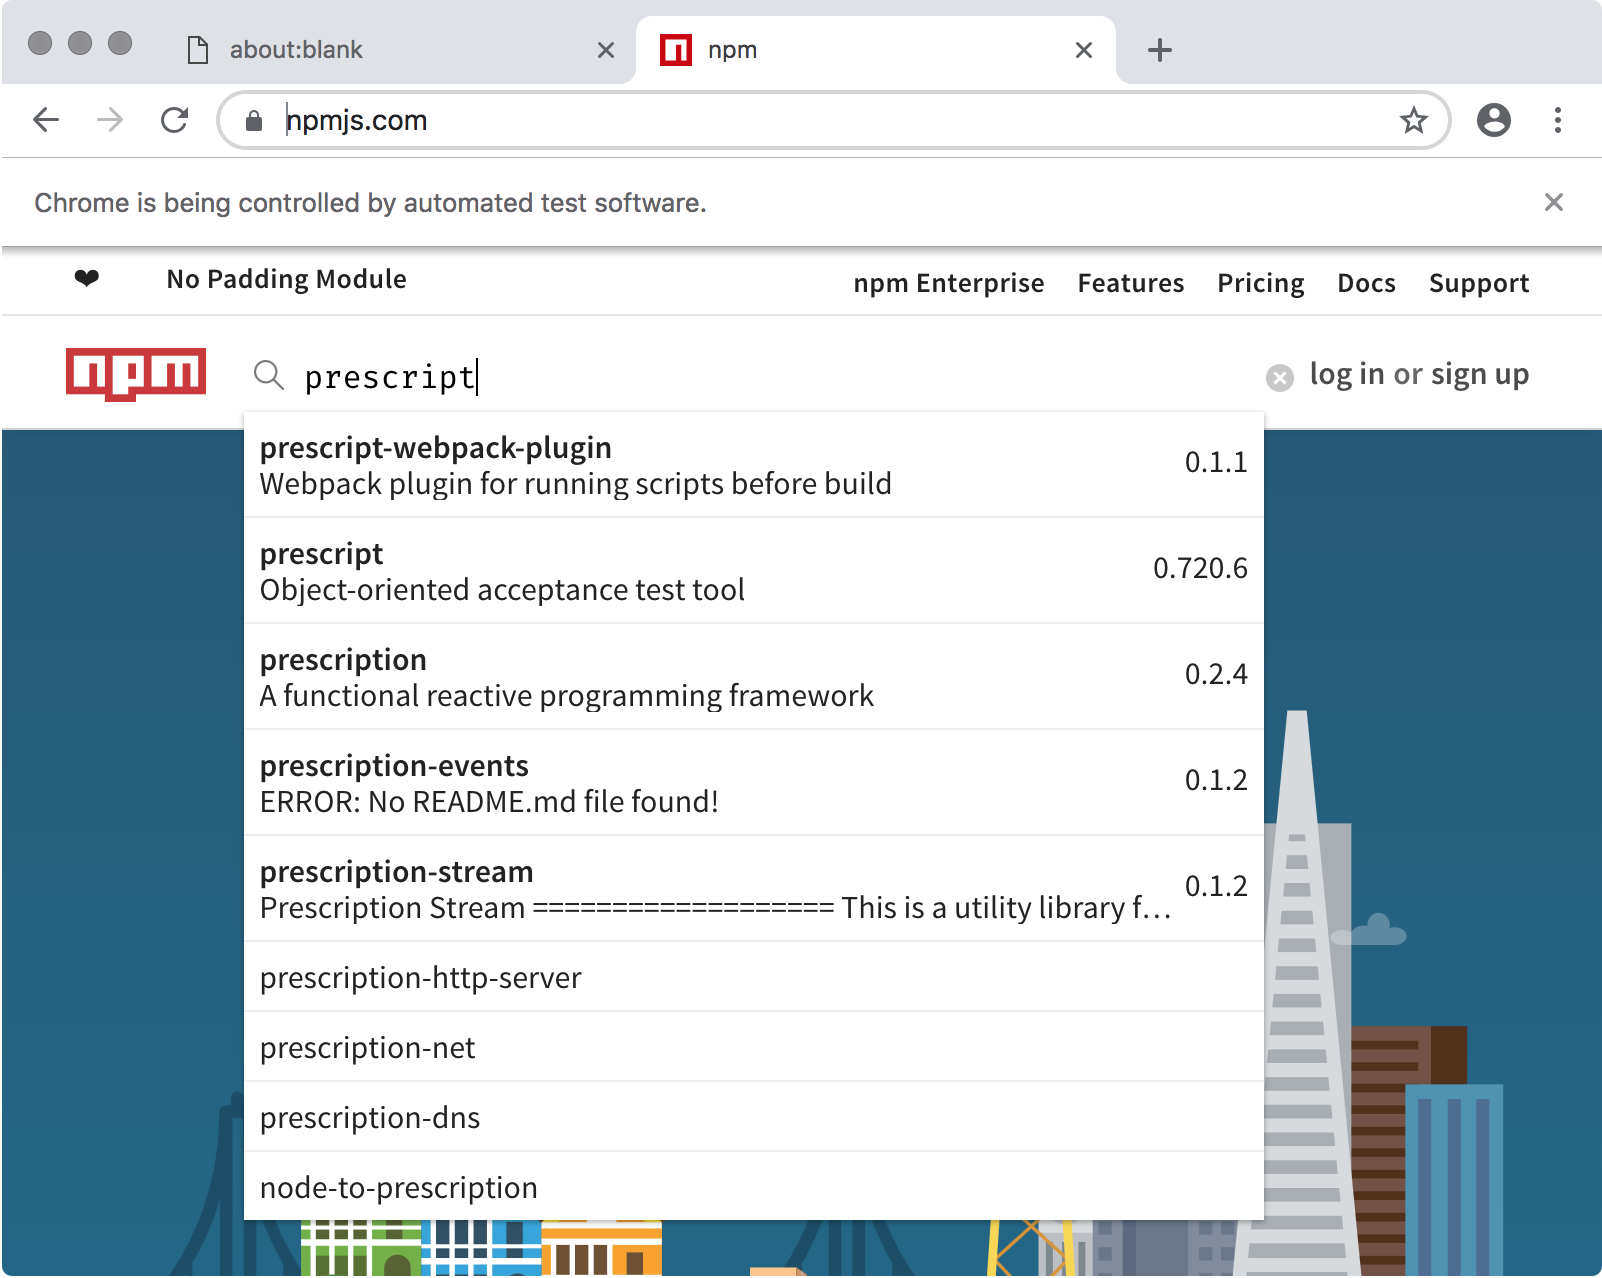
Hm… 🤔 what’s going on here???…………Oh! 😲 There it is! 💡
We found that in step 4 (‘Search for prescript’), we typed the search text but didn’t press Enter. That’s why we stay at the same page...
  action('Search for prescript', async state => {
    await state.page.type('[name="q"]', 'prescript')
  })
So, we can say that the fault in step 4 caused the failure in step 5.
FAULT vs FAILURE
prescript tells you which step caused the test to fail. But the failure may be caused by a fault in a prior step.
# Fixing the test
Let’s go ahead and fix it…
Update the test so that we press Enter key after typing in “prescript”:
  action('Search for prescript', async state => {
    await state.page.type('[name="q"]', 'prescript')
    await state.page.keyboard.press('Enter')
  })
Don’t forget to save the file.
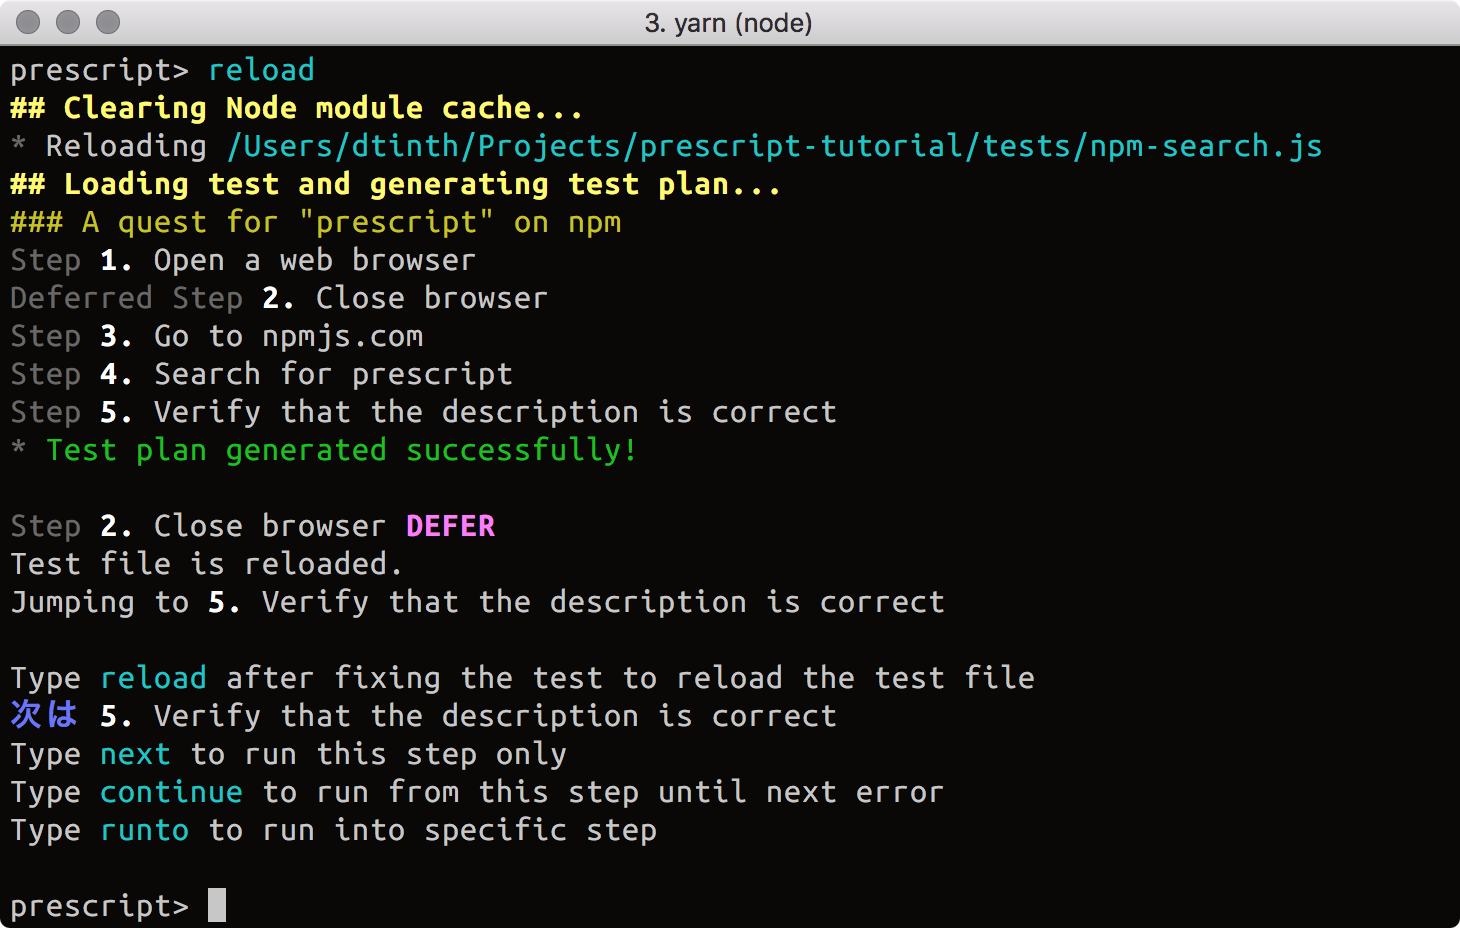
# Hot-reloading the test
Now we’re going to hot-reload our test file.
Come back to prescript interactive shell.
Type in
reload(orr) and press Enter.
The test plan will be reloaded, but all your test state will remain intact.
NOTE
That’s why we need to use prescript-provided state object — its contents are
preserved across reloads! Had we used local variables (i.e. using
let browser, page instead of state.browser and state.page), our
newly-loaded test code wouldn’t be able to access the browser and page
created in the previously-loaded test code, because it’s — well — local to it.
That’s how hot-reloading is made possible in prescript.
# Resuming the test
When you reload your test, prescript will put you before the failed step.
But as aforementioned, the fault in step 4 caused the failure in step 5. That means to recover, we must go back to step 4 and continue from there.
Jump to step 4 by typing
jump 4(orj 4) and press Enter.Continue running the test by typing
continue(orc) and press Enter.
NOTE
That’s why you need to break down your test into discrete steps — this allows prescript to take control of the way your test code is executed, thus letting you jump around and resume execution in the middle of your test.
Let’s see how it goes…
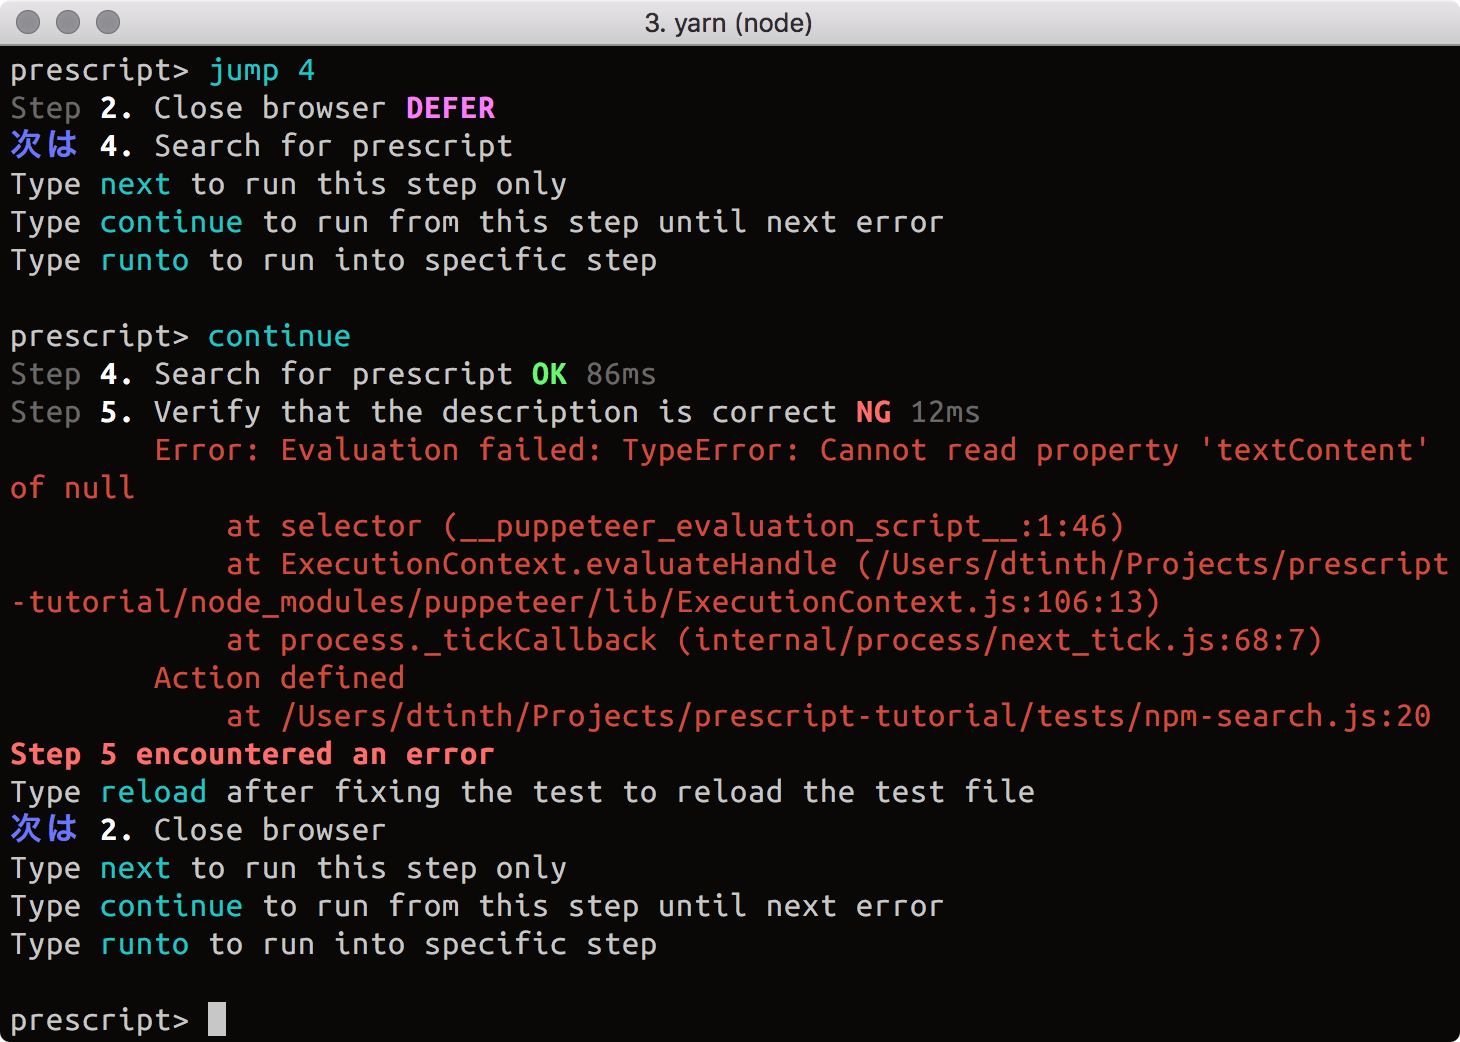
Waaaa—!
It failed again!
Let’s look at the browser to see what happened...
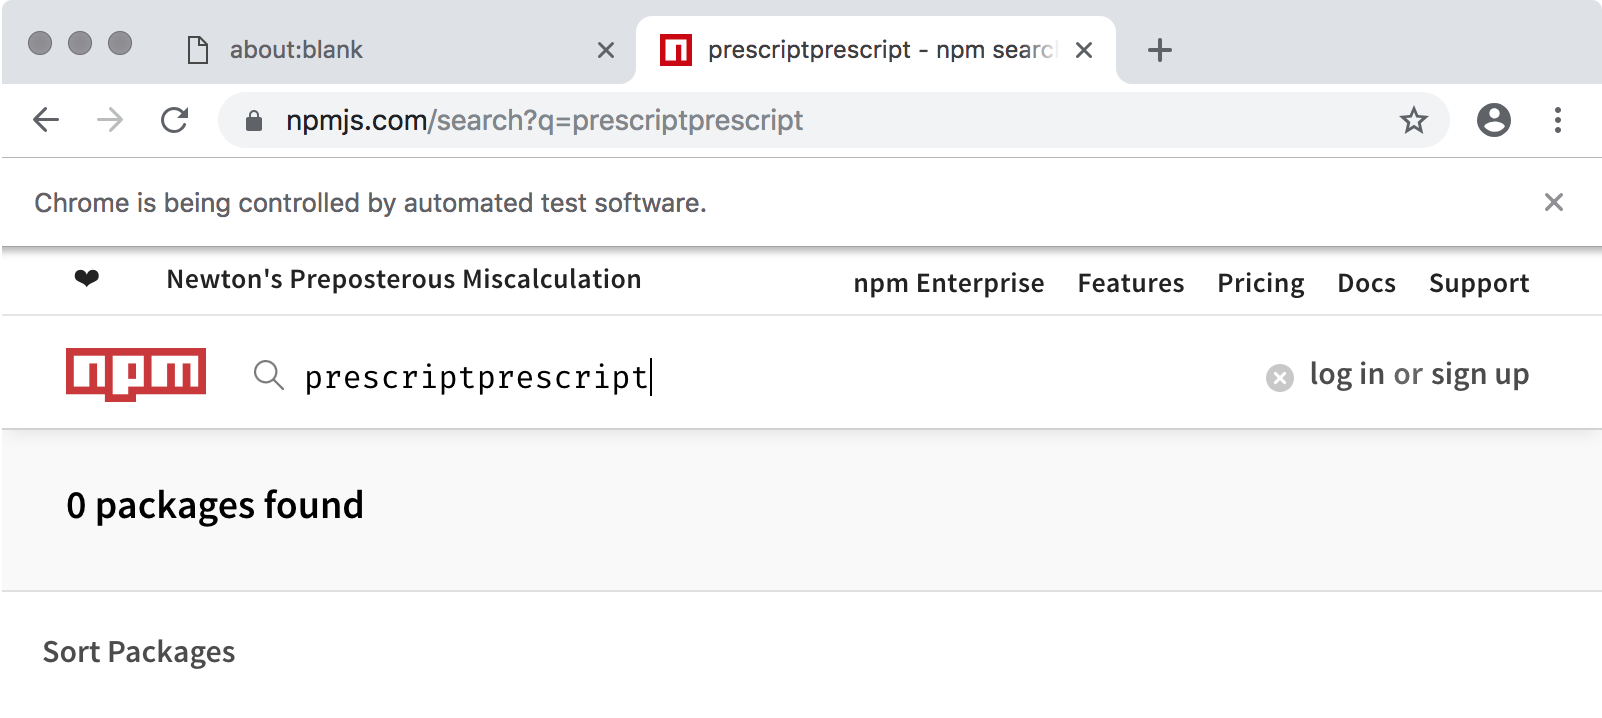
This time, the search box contains the text ‘prescriptprescript’. Since we retried step 4, it got executed twice. That means the word ‘prescript’ got typed into the search box twice!
LESSON
When reloading or jumping, make sure to roll the state back before continuing!
# Rolling the state back
Ok, let’s try again.
Jump back to step 4 by typing
jump 4(orj 4) and press Enter.In the browser, manually delete the text in the search box. Also click the Back button so that we are back to npm’s homepage. This effectively brings us to the known state before step 4 is first executed.
Continue running the test by typing
continue(orc) and press Enter.
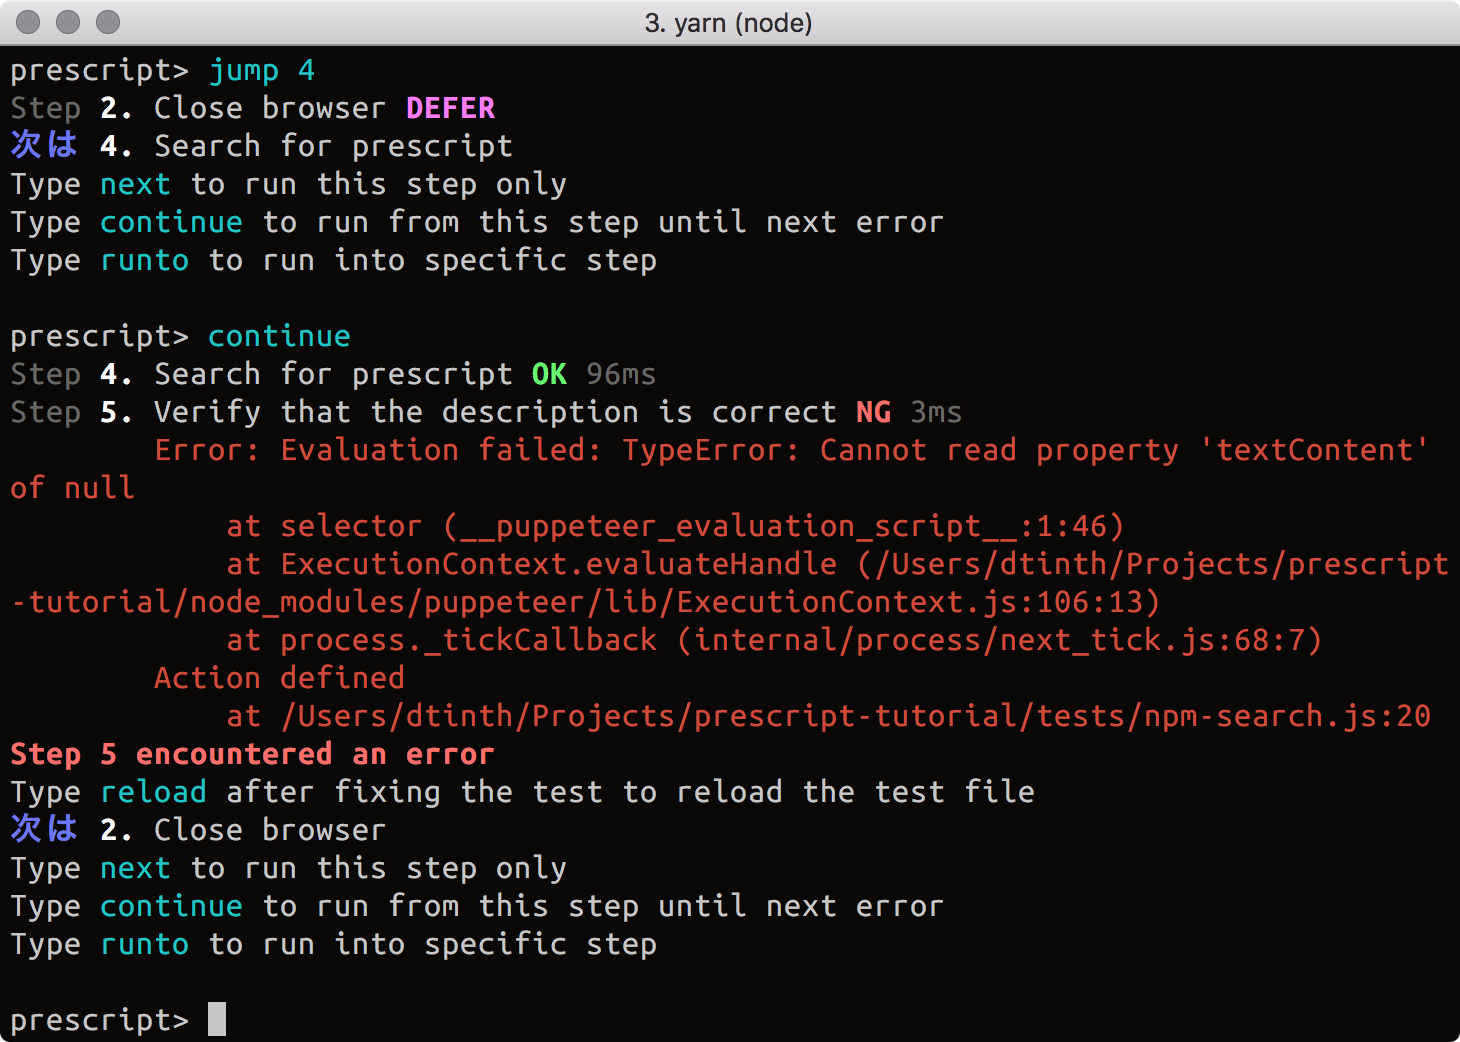
Ouch… It failed again, at step 5 (‘Verify that the description is correct’)!
But this time, it seems that the browser is showing the correct result.
This is because step 4 finished immediately after we press Enter. It didn’t wait for the search results to load or anything; it just hit Enter and moved on to step 5 right away. So, step 5 tried to verify the search result immediately, when it’s not available yet. Of course, this would fail the test.
# Fault containment
As you can see, a fault in one step can cause a failure in subsequent steps. This can lead to tests that are hard to debug. To write tests that can be easily debugged, it’s important to follow the fault containment principle…
FAULT CONTAINMENT PRINCIPLE
Make sure each step verifies the outcome of its own action.
For example,
- Step 1 (‘Go to npmjs.com’) should wait for the web page to load, and verify
that
npmjs.com’s home page is indeed displayed (instead of e.g. 502 pages). - Step 2 (‘Search for prescript’) should wait for the search results to load, and verify that the search results are available before moving on.
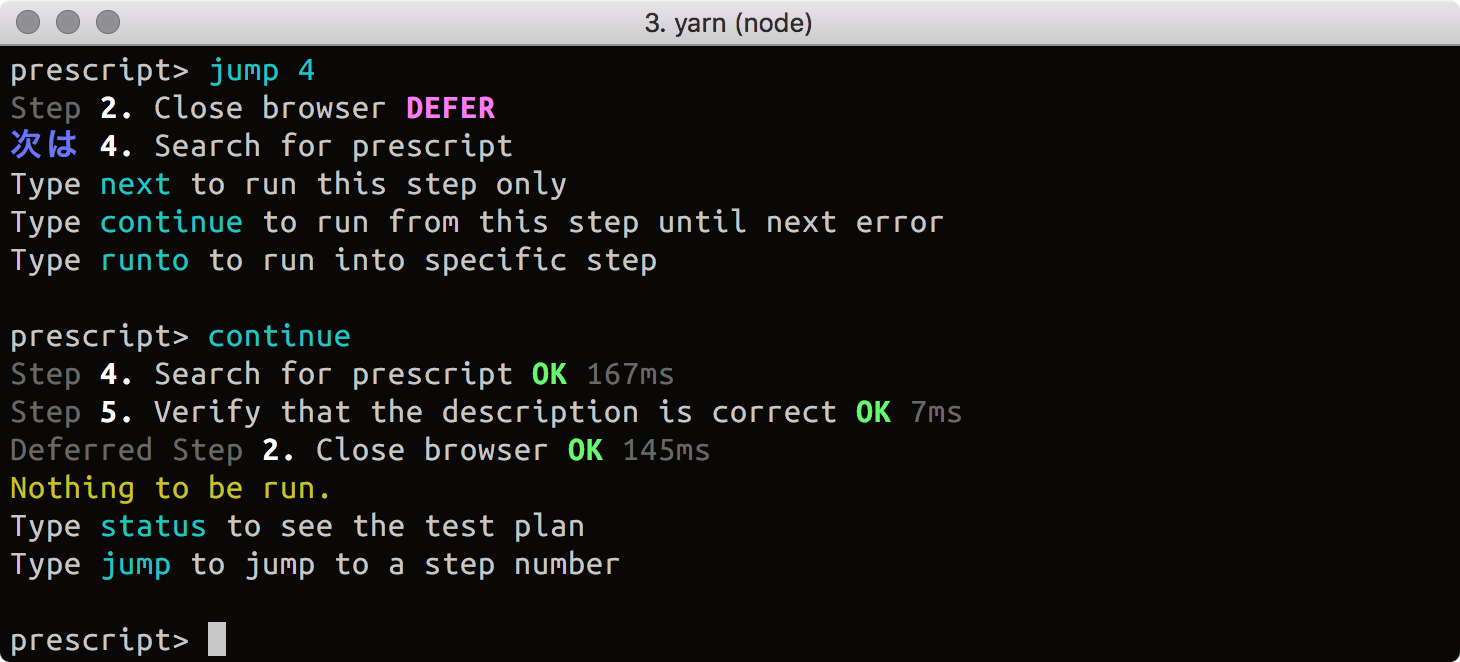
Update the test so that each step waits and checks for the outcome of its own actions (Don’t forget to save the file!):
  action('Go to npmjs.com', async state => {
    await state.page.goto('https://npmjs.com')
    await state.page.waitForSelector('#app main')
  })
  action('Search for prescript', async state => {
    await state.page.type('[name="q"]', 'prescript')
    await state.page.keyboard.press('Enter')
    await state.page.waitForSelector('[class^="search__packageList"]')
  })
# Seeing the test pass
Hopefully, we’ve fixed everything now.
- In prescript interactive shell,
reload,jump 4, andcontinue.
Now, our test should pass 😉
- Exit prescript by typing
exitand press Enter.
Now you can see how having an interactive development mode can help you debug a failed test with tighter feedback loop.
# Running the test in non-interactive mode
Having an interactive development mode at hand is great, but we also want to run our tests as part of a continuous integration build process. That’s where we should run the test in non-interactive mode.
Run the test in non-interactive mode using
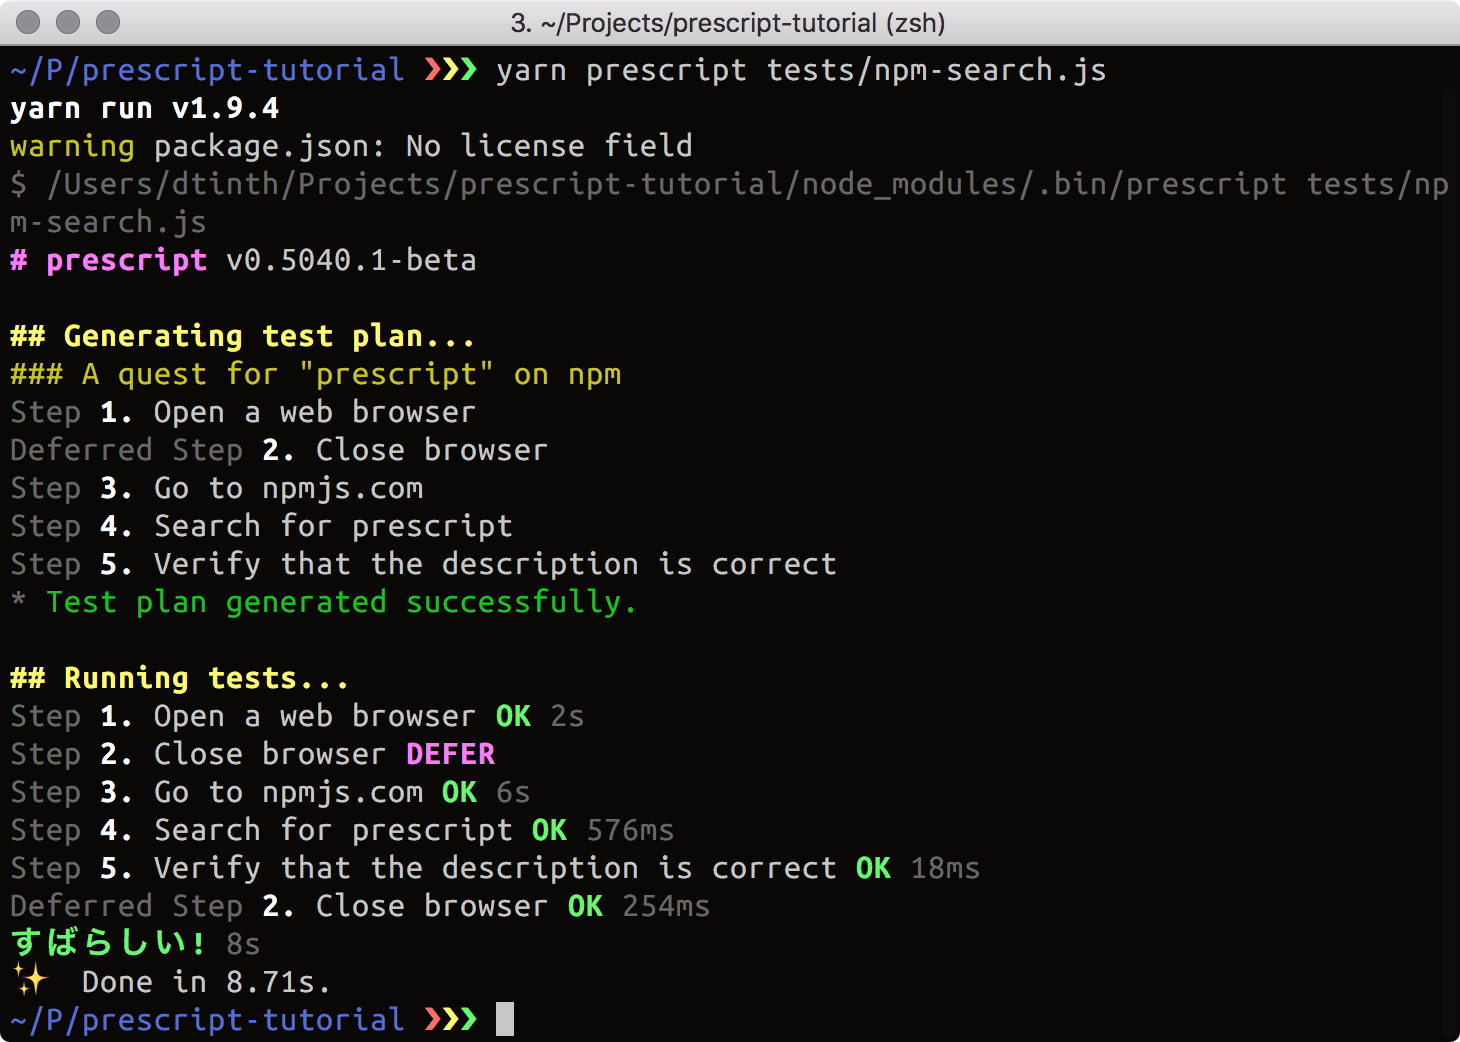
yarn prescript <test-file>:yarn prescript tests/npm-search.js
This will run the test to its completion, or exits with an error code if the test failed. The prescript interactive shell is not available in this mode.
# Generating Allure test reports
As introduced in the previous page, prescript can generate a beautiful test report using Allure.
Install the Allure command-line tool by following the installation steps in its docs.
Set the environment variable
ALLURE_TEST_RESULTSfor the current shell:# Linux, macOS export ALLURE_RESULTS_DIR=allure-results # Windows SET ALLURE_RESULTS_DIR=allure-resultsRun the test in non-interactive mode:
yarn prescript tests/npm-search.js
You should see a directory called allure-results created. Inside it, you should see XML files.
NOTE
If you use Git, don’t forget to add allure-results to your .gitignore.
# View the test report
As you can see, prescript generates XML files to be used by Allure to generate a test report.
To view the test report:
allure serve allure-results
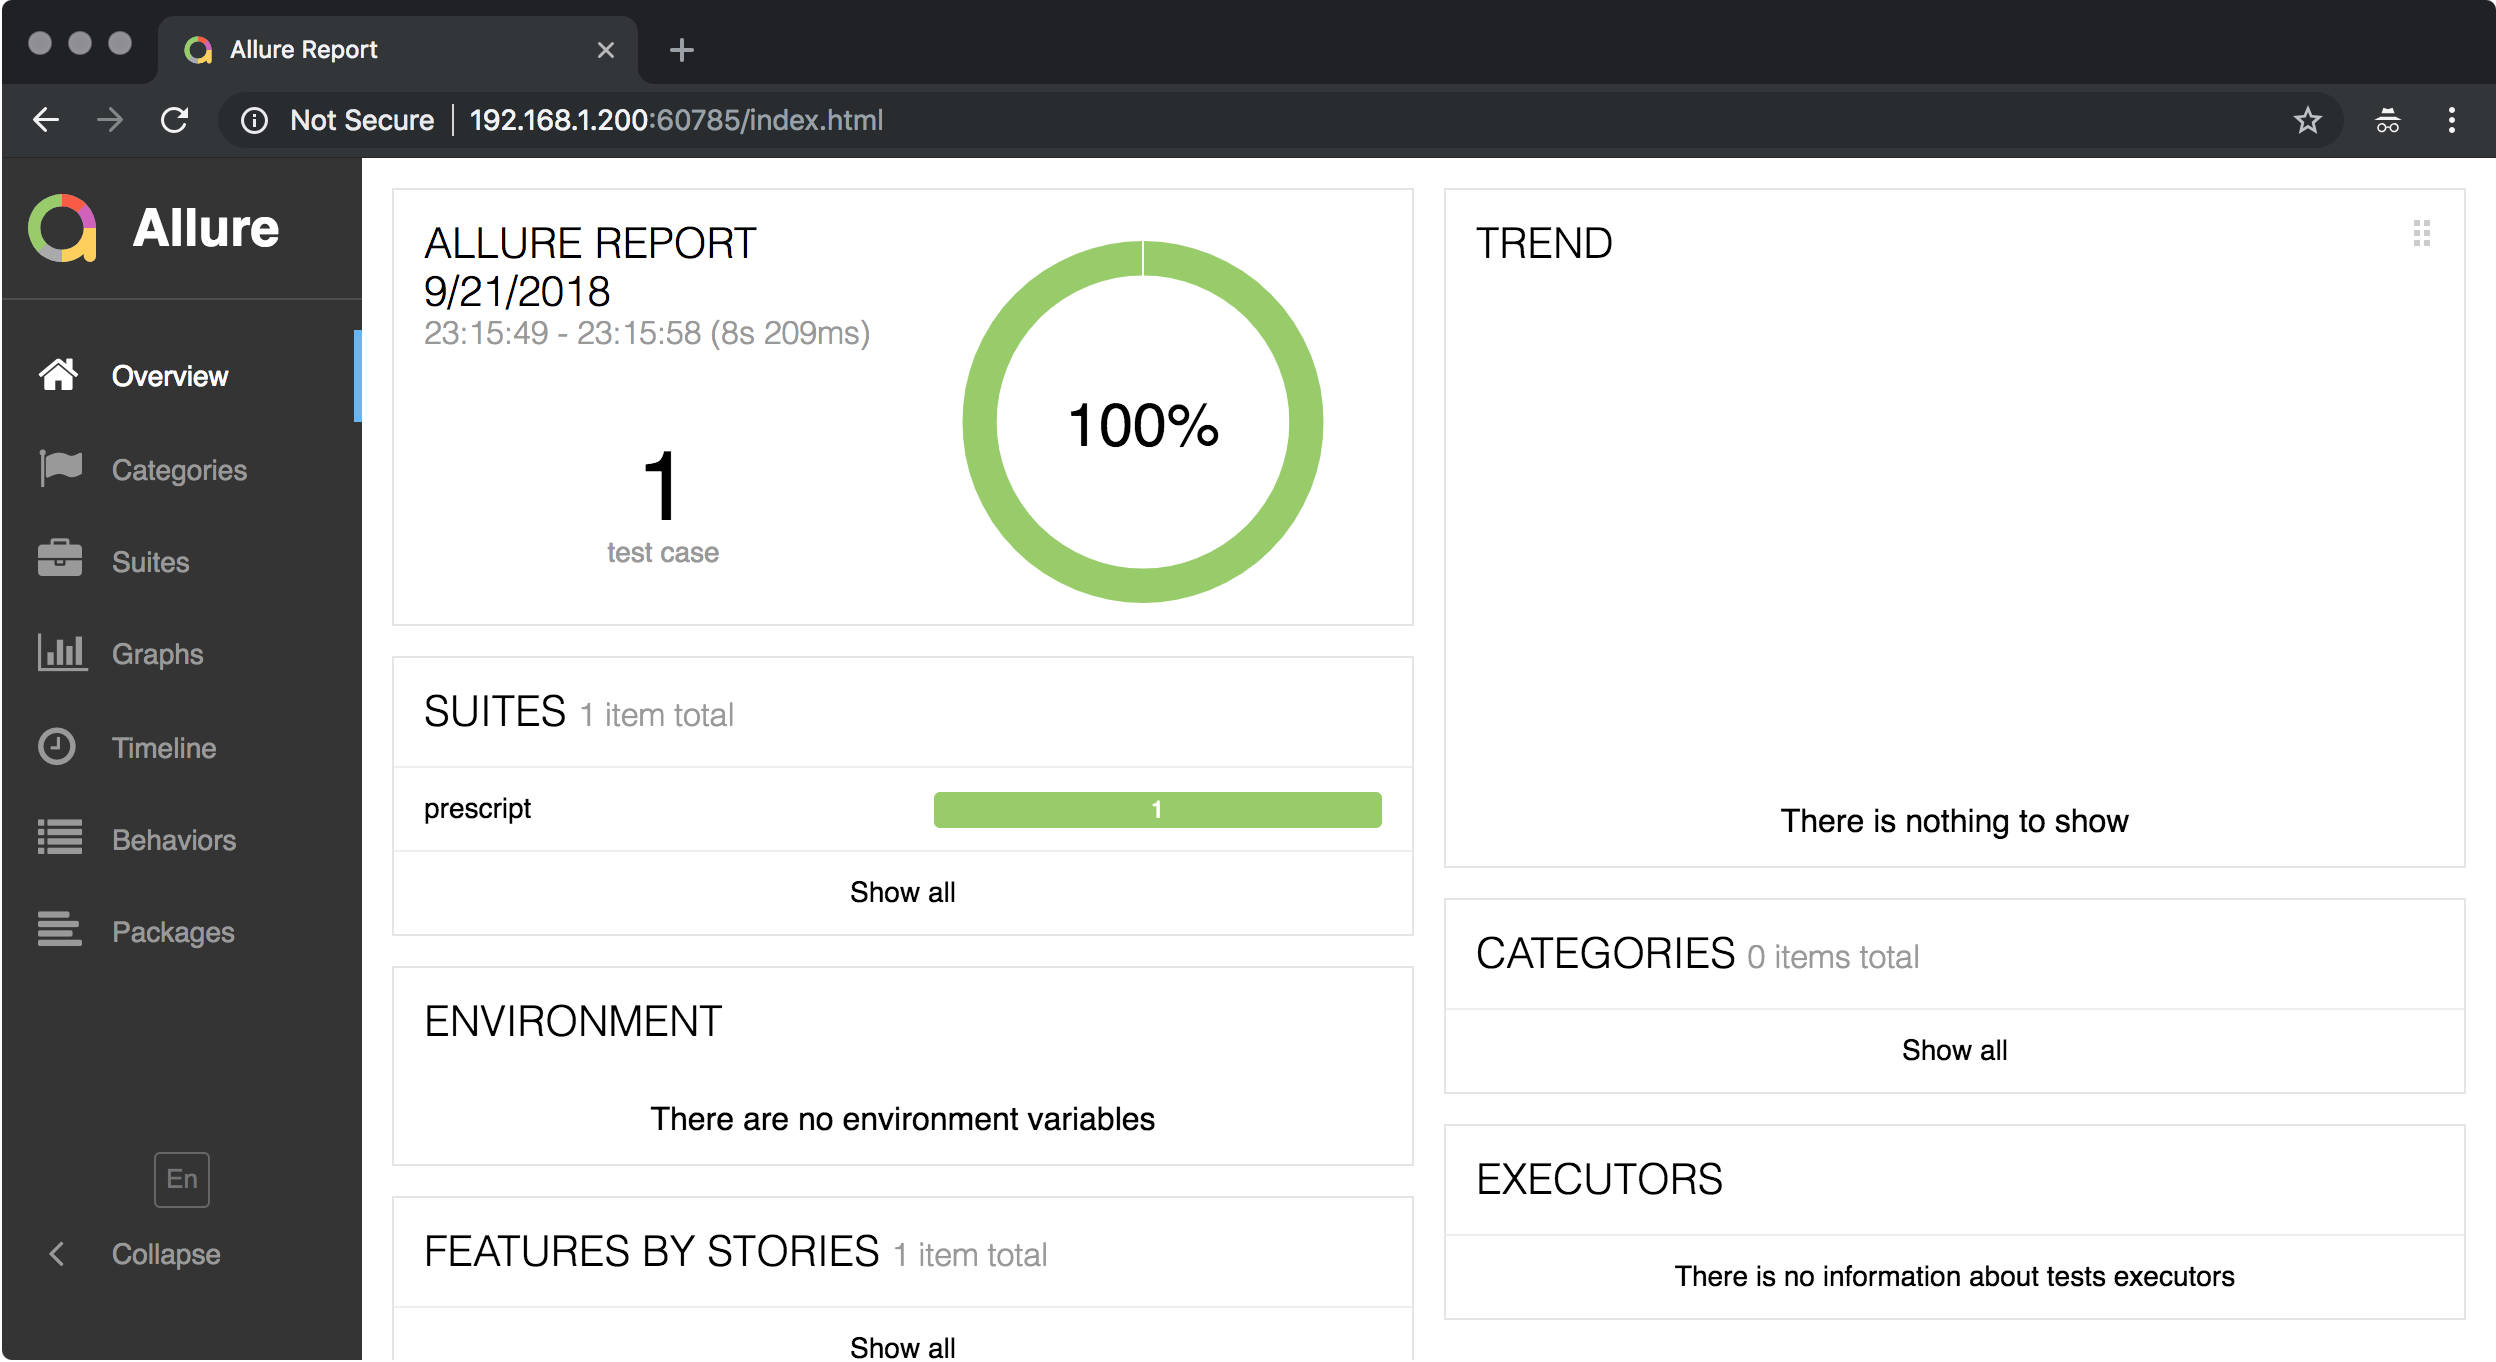
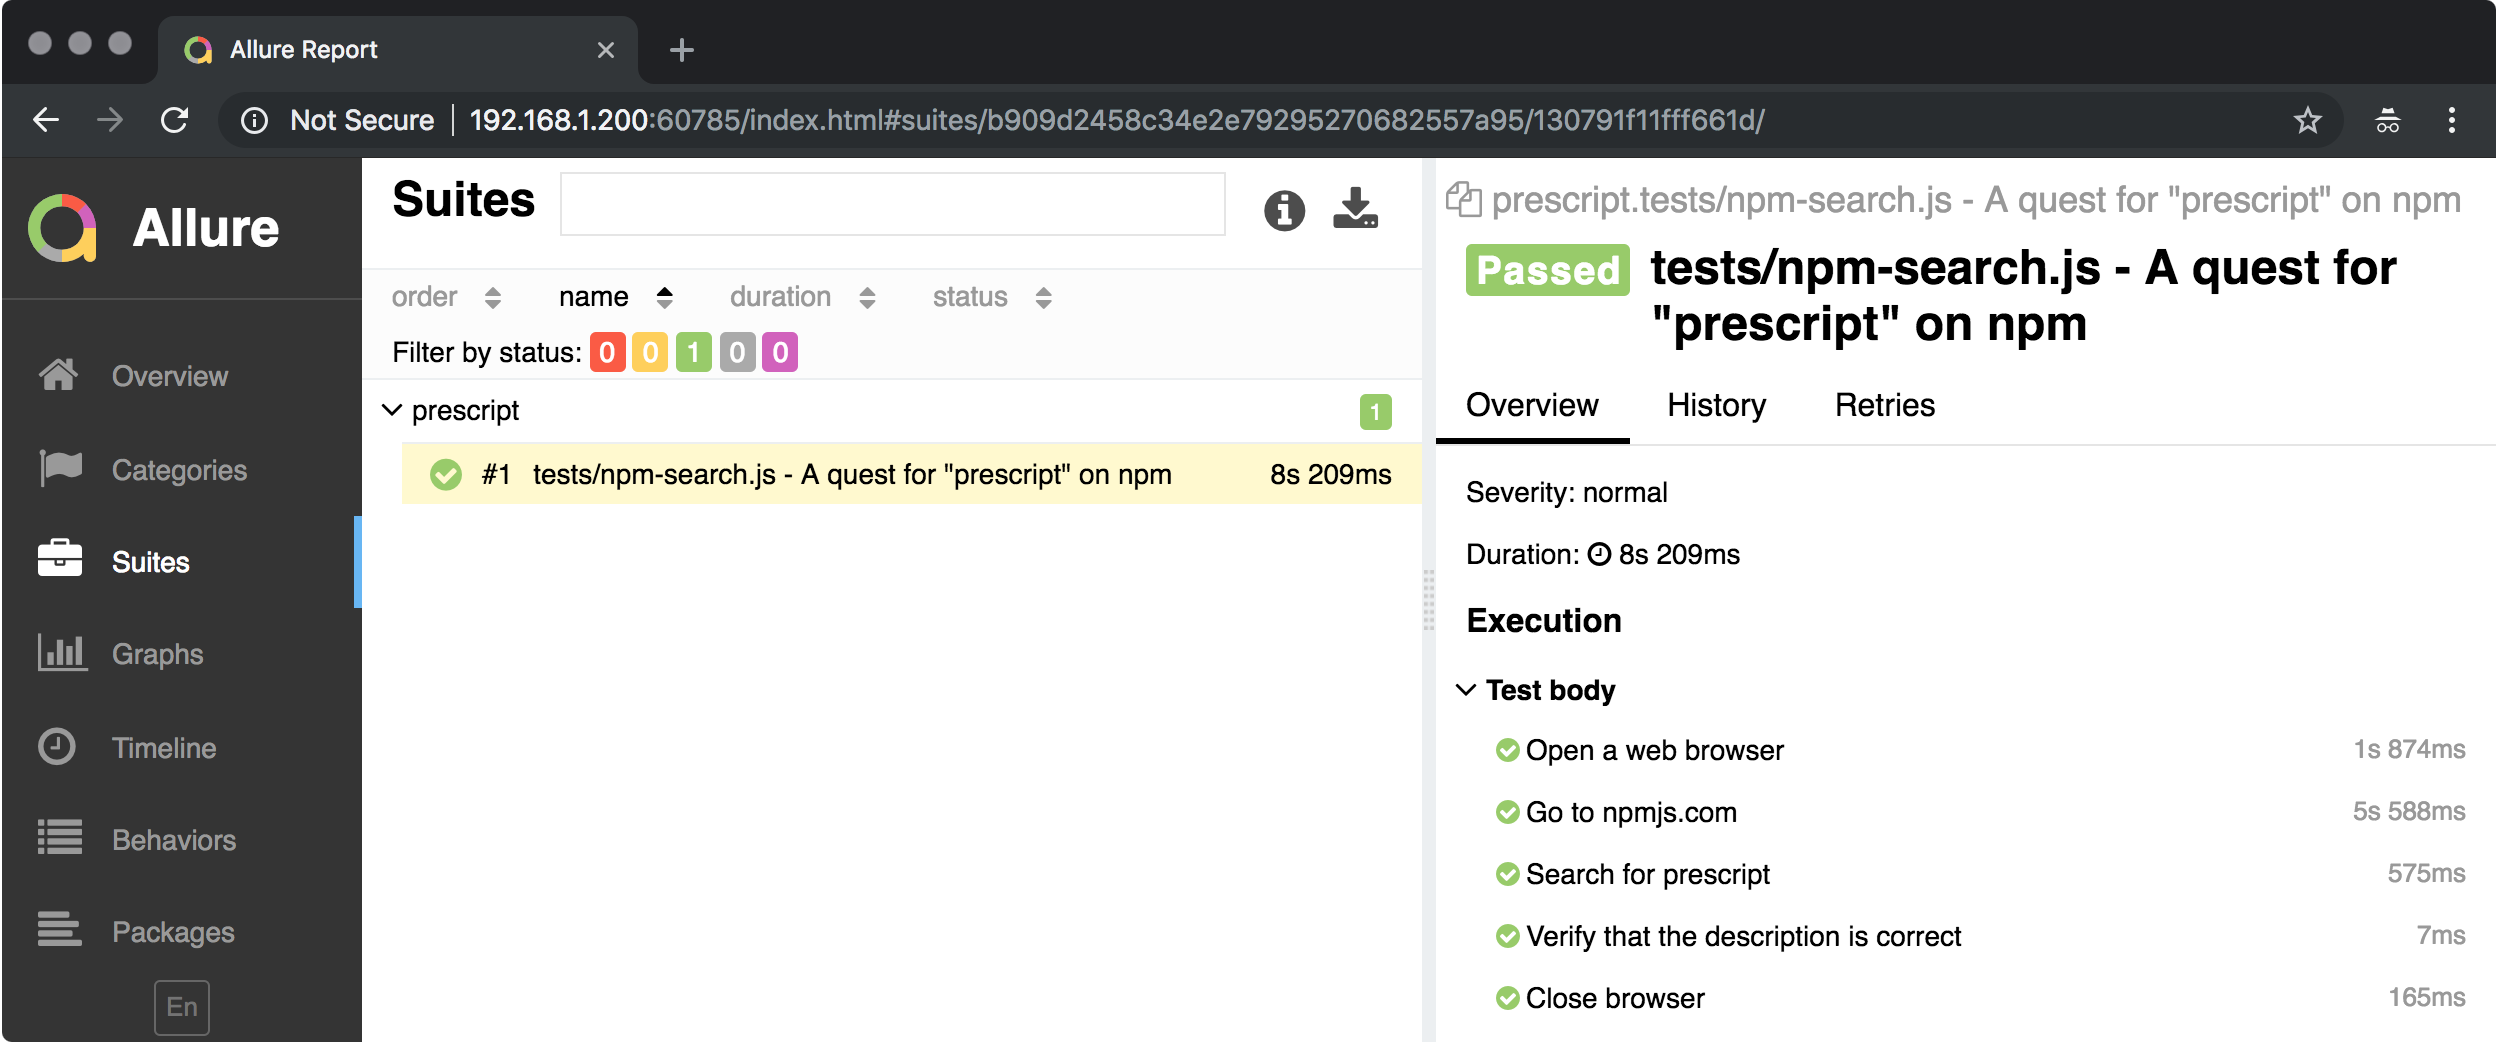
Nice.
# Generate the test report
The allure serve command lets you view the report in the browser. But you may
want to generate the test report and upload them for others to see.
To generate the test report:
allure generate test-results
A directory allure-report should pop up in your project directory. You can
then publish your generated allure-report and share with your colleague.
NOTE
If you use Git, don’t forget to add allure-report to your .gitignore.
# Conclusion
We learned how to write test in prescript using the
test,action, anddeferAPIs.We learned how to use the prescript interactive shell to debug a test.
We learned how to run tests in interactive development mode and non-interactive mode.
We learned how to generate an test report using Allure.
The next section will dive into more details about writing tests in prescript. There, you will learn how to, for example, define nested steps, or use a page object pattern for a cleaner test code.